Willkommen bei CodeCrafted, wo die Kunst der Softwareentwicklung zum Leben erwacht. Ich, als erfahrener Softwareentwickler, nehme Sie mit auf eine Reise durch meine Arbeit in IT-Projekten, Embedded-Systemen und der Welt der Künstlichen Intelligenz. CodeCrafted steht für das kunstvolle und sorgfältige Entwerfen von Code, genau wie ein Handwerker sein Meisterwerk erstellt. Hier teile ich Einblicke in meine persönlichen Projekte, gebe praktische Tutorials und diskutiere über aktuelle Trends und Innovationen. Egal, ob Sie ein erfahrener Profi sind, der neue Ideen sucht, oder ein Anfänger auf dem Gebiet der Softwareentwicklung – bei CodeCrafted ist für jeden etwas dabei. Begleiten Sie mich auf dieser spannenden Reise, um das Handwerk des Codierens zu erkunden und gemeinsam die Zukunft der Technologie zu gestalten!
Flutter- Interop Earlier, I had built the entire application using .NET MAUI, as many readers may remember from my previous project CafeteriaApp. That project followed Clean Architecture principles with MVVM for the presentation layer and Autofac for dependency injection across domain, application, and infrastructure boundaries.
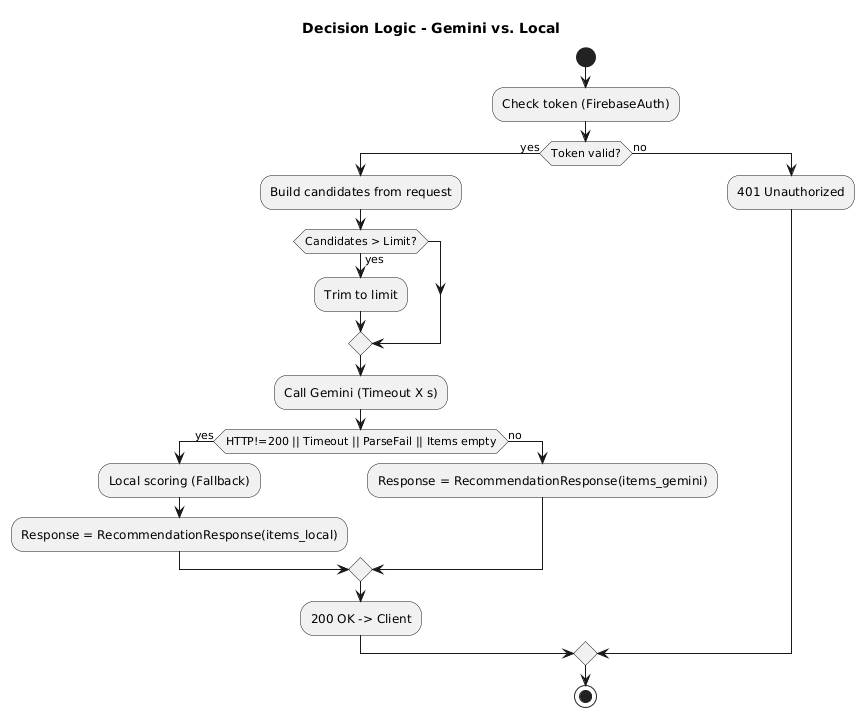
During a meetup, the organizers asked me to port the project to Flutter, since most participants were not .NET developers and would find a MAUI-based demo difficult to follow. Instead of rewriting everything from scratch, I initially decided to extract the existing business logic and Firebase integration into a standalone .NET library, callable from Flutter via FFI (Foreign Function Interface). This document summarizes the architecture, constraints, and lessons from that interop attempt and explains why I ultimately migrated everything to pure Flutter/Dart.
Objective
Extract .NET business logic into a NativeAOT library and invoke it from Flutter via FFI while maintaining debuggability, diagnostics, and predictable behavior — and present the trade-offs that led to a full Flutter/Dart rewrite.
Architecture
Facade: a single exported layer InteropFacade exposing [UnmanagedCallersOnly] methods.
ABI: C ABI; input/output as UTF-8 JSON.
DI Container: initialized once (app_init); subsequent calls are pure use-case invocations.
Error Handling: all exports wrapped in Handle(…); return { „ok“: true|false, „error“: { „code“,“message“ } }.
Threading: single-threaded dispatcher; incoming calls accept a CancellationToken.
Versioning: interop_version() plus a major protocol version in every request.
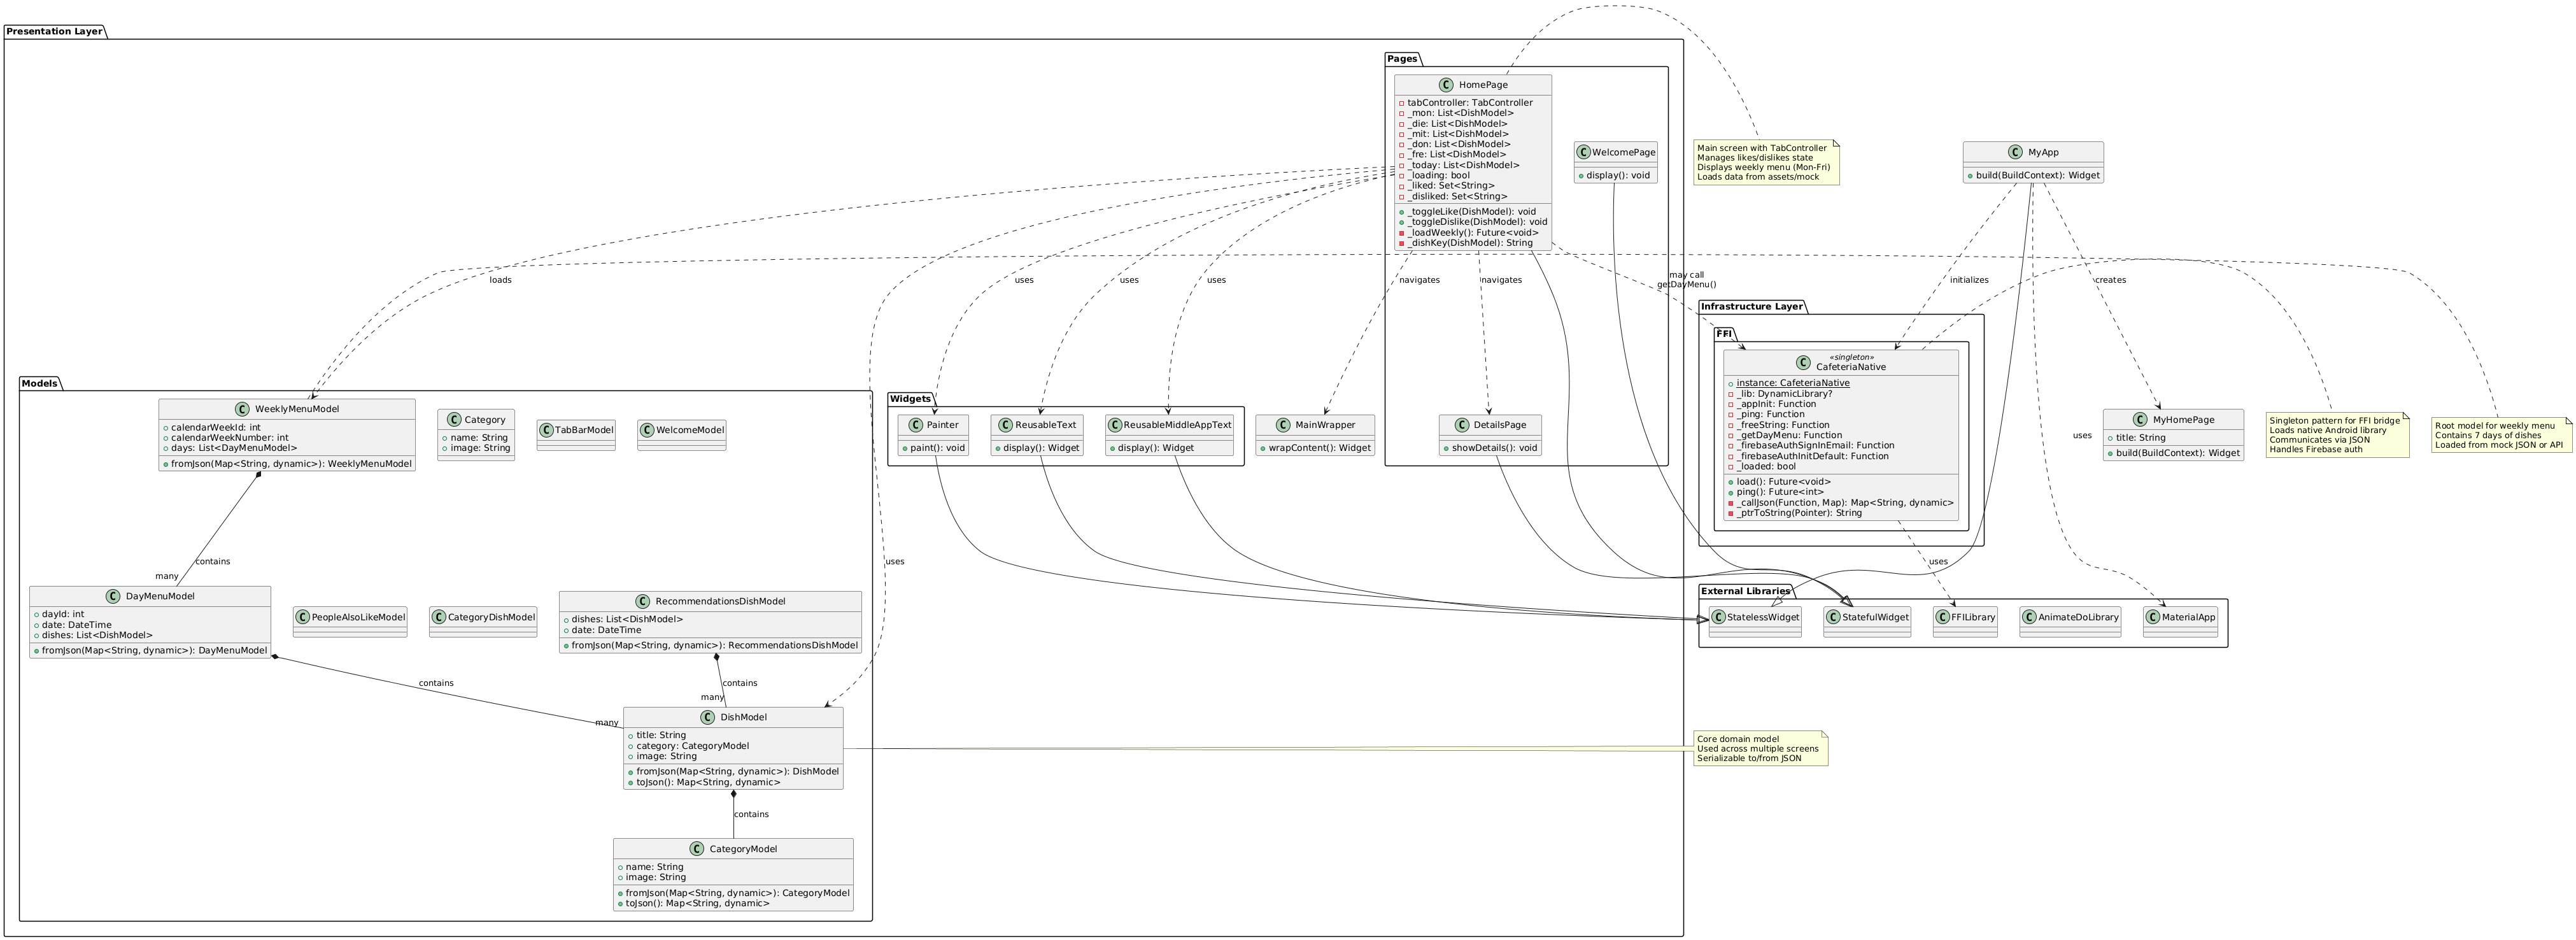
Presentation Layer (Flutter): Pages, Widgets, and MainWrapper align with MVVM/Presenter concerns — UI state, navigation, and rendering. The Models package contains UI-facing models/DTOs that mirror domain entities but remain presentation-owned.
Infrastructure Layer: the CafeteriaNative singleton represents the Interop/FFI boundary. It loads the native library, marshals JSON requests/responses, exposes calls like getDayMenu() and Firebase auth helpers, and centralizes resource ownership (e.g., freeString).
External Libraries: Flutter framework types and animation/FFI libraries are explicit dependencies at the system boundary.
Data Flow: HomePage may call CafeteriaNative.getDayMenu() to fetch menu data, then map it into WeeklyMenuModel for display. Error handling, retries, and state transitions happen in the presentation layer.
Diagnostics and Logging
Logging: Microsoft.Extensions.Logging with a ring-buffer sink and FFI callback subscribe_logs(level).
Diagnostic Mode: interop:set_diagnostics(true) enables detailed request/response tracing with secret masking.
Crash Safety: wrap all exports in try/catch, log JSON input and stack trace.
Symbols: preserve .pdb, .dSYM, or map files in CI artifacts for crash analysis.
Firebase Integration
Avoid calling native Firebase SDK from .NET AOT — common crash source.
Initialize Firebase on the platform side (Kotlin/Swift) before loading the .NET library.
Prefer REST APIs (Identity Toolkit, RTDB/Firestore REST) when feasible.
If native SDK is unavoidable, use Firebase C++ SDK via P/Invoke and ensure main-thread initialization and unified c++_shared.
Firebase via .NET NativeAOT and FFI: Why It Crashes and How to Fix It
Short answer: Firebase calls from a .NET NativeAOT library over FFI often crash due to initialization, threading, and linker/runtime conflicts.
Common Crash Causes
Improper SDK initialization (Android Application.onCreate() main thread; iOS didFinishLaunching main thread)
Debugging proved to be the primary bottleneck. Debugging a NativeAOT library loaded through FFI is cumbersome: breakpoints don’t work reliably, stack traces are often lost, and crashes occur deep inside native code without readable output. I ultimately spent more time debugging the .NET NativeAOT library than it would have taken to reimplement the business logic in Flutter/Dart.
As a result, I decided to fully rewrite the application in Flutter/Dart, keeping the same Clean Architecture and use-case structure, while eliminating cross-language interop complexity and NativeAOT constraints. The project now builds faster, debugging is transparent, and Firebase integration is native and reliable.
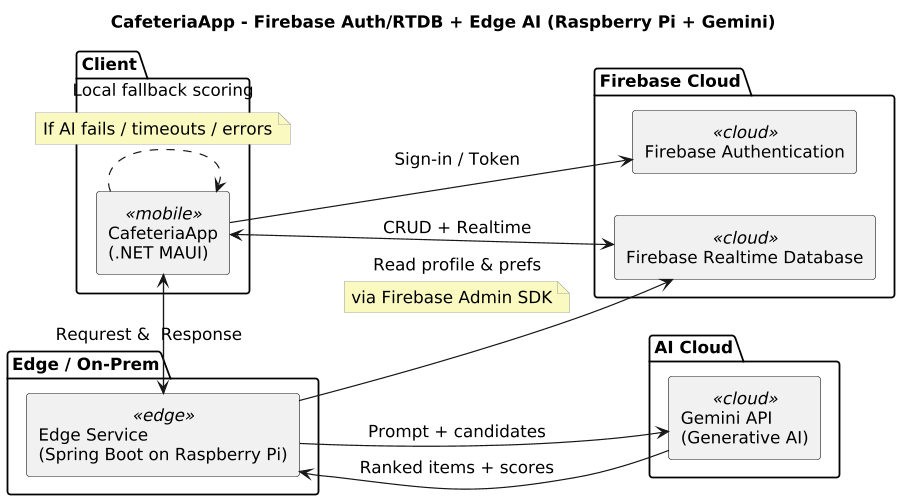
The CafeteriaApp is a cross‑platform application built with .NET MAUI that gives users access to the daily and weekly cafeteria menu, offers personalized recommendations, and conveniently manages personal balance. The app combines modern client technologies (MVVM, dependency injection, reactive data flows) with cloud services (Firebase Realtime Database, Firebase Auth, Analytics/Crashlytics) and an optional AI layer for recommendations. A consistent offline‑first design ensures core features remain available without a network; when connectivity returns, data is synchronized efficiently.
The goal of this blueprint is to describe the architecture, key use cases, data flows, and non‑functional requirements so that development, QA, and operations share a common, reliable foundation.
2. User Experience and Core Features The app first presents the day’s menu. All dishes of the day are shown with name, description, category, and optional icons. In addition, the weekly menu can be browsed so users can plan ahead. Particularly relevant dishes can be marked with a simple “Like.” This preference is saved and forms the basis for personalized recommendations later.
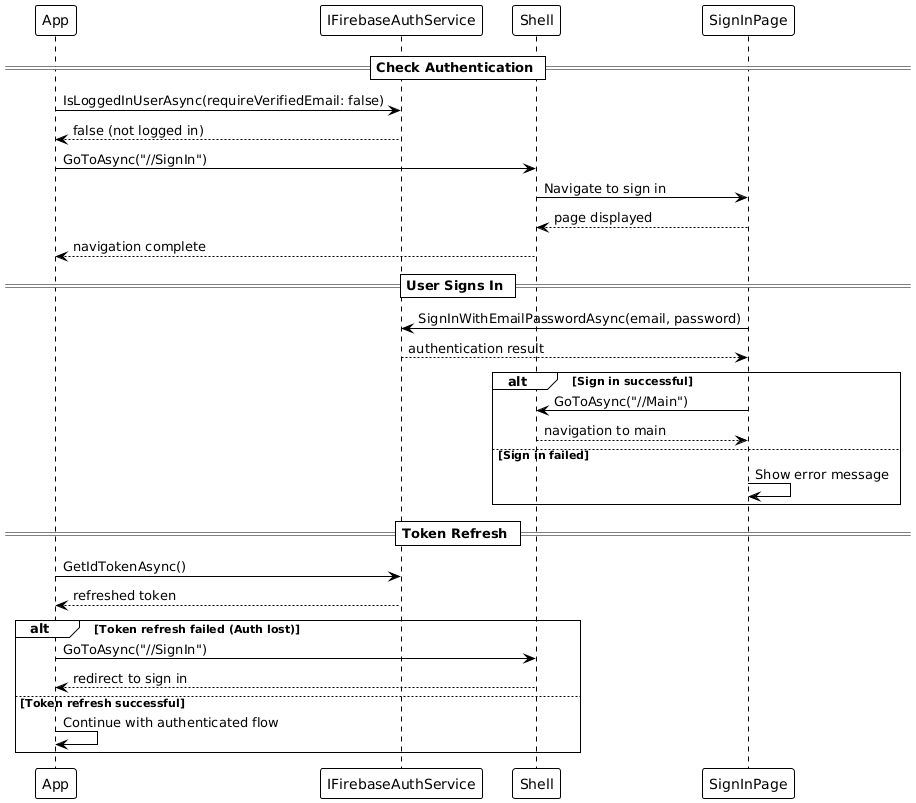
User authentication is performed via Firebase Auth using email and password. Registration and sign‑in are straightforward, support password reset via email, and allow linking anonymous accounts to email accounts. Automatic token renewal provides seamless session management without repeated user intervention.
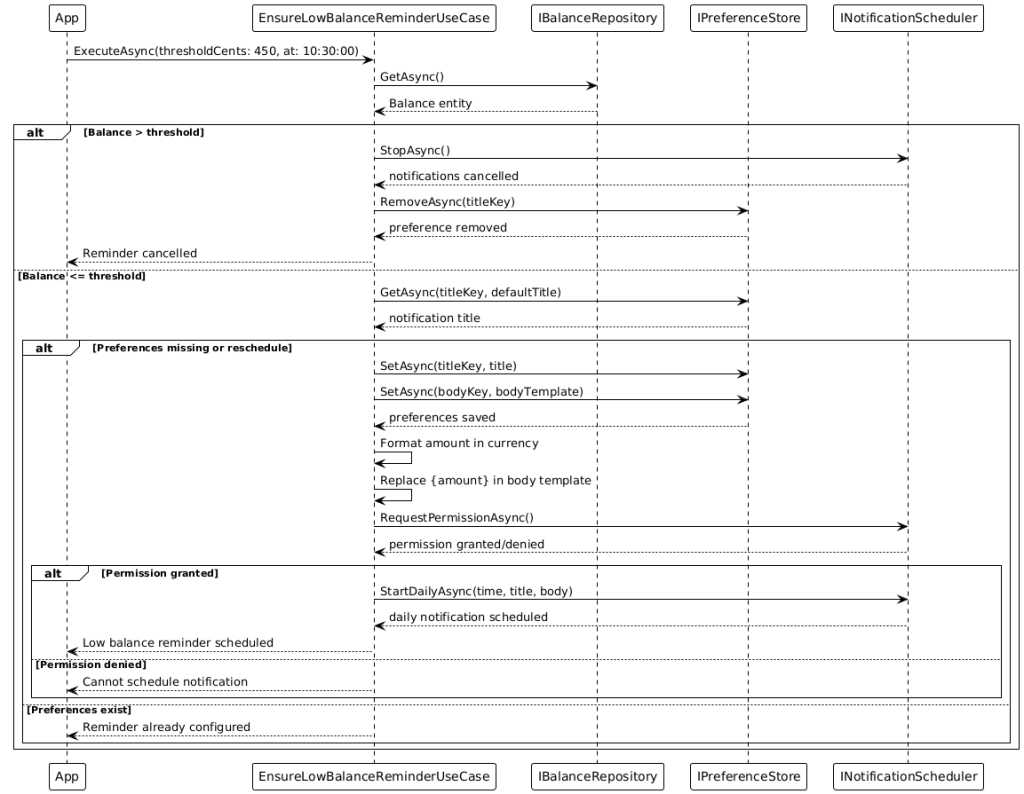
A central element is balance management. The app shows the current balance in euro‑cents, supports top‑ups with configurable amounts, and automatically debits meals (standard price: €4.50). All transactions are tracked in a history. If the device is offline temporarily, the app buffers transactions locally and synchronizes them automatically once a network is available again.
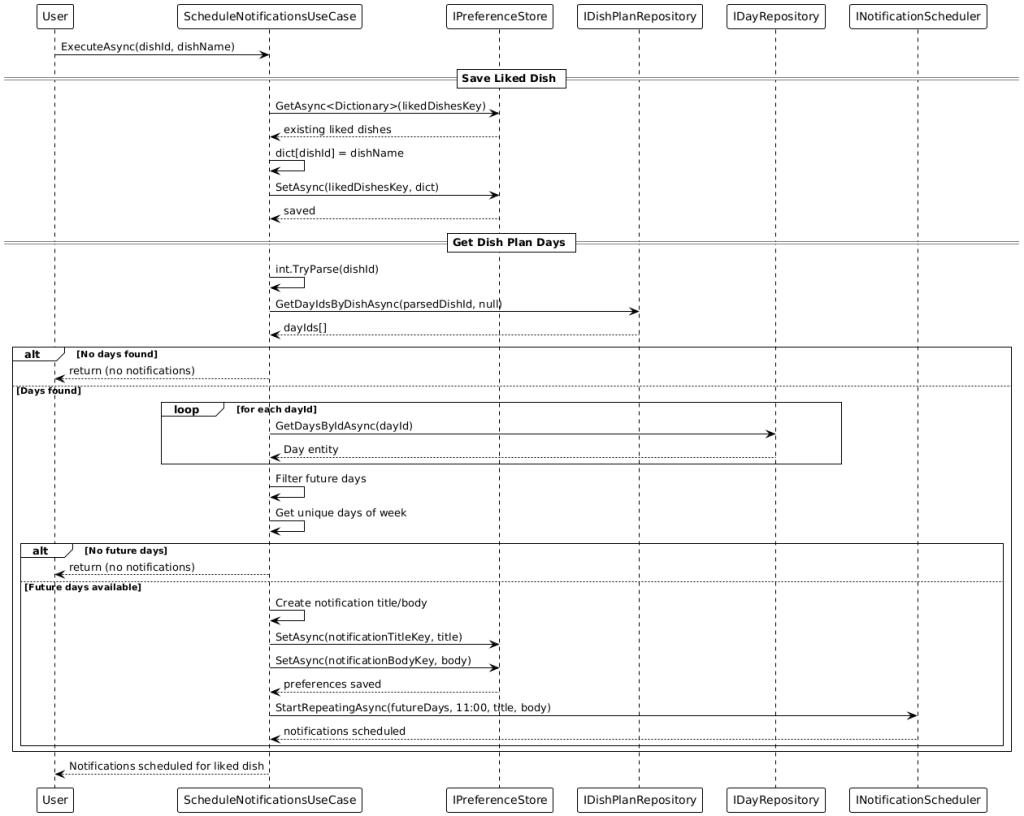
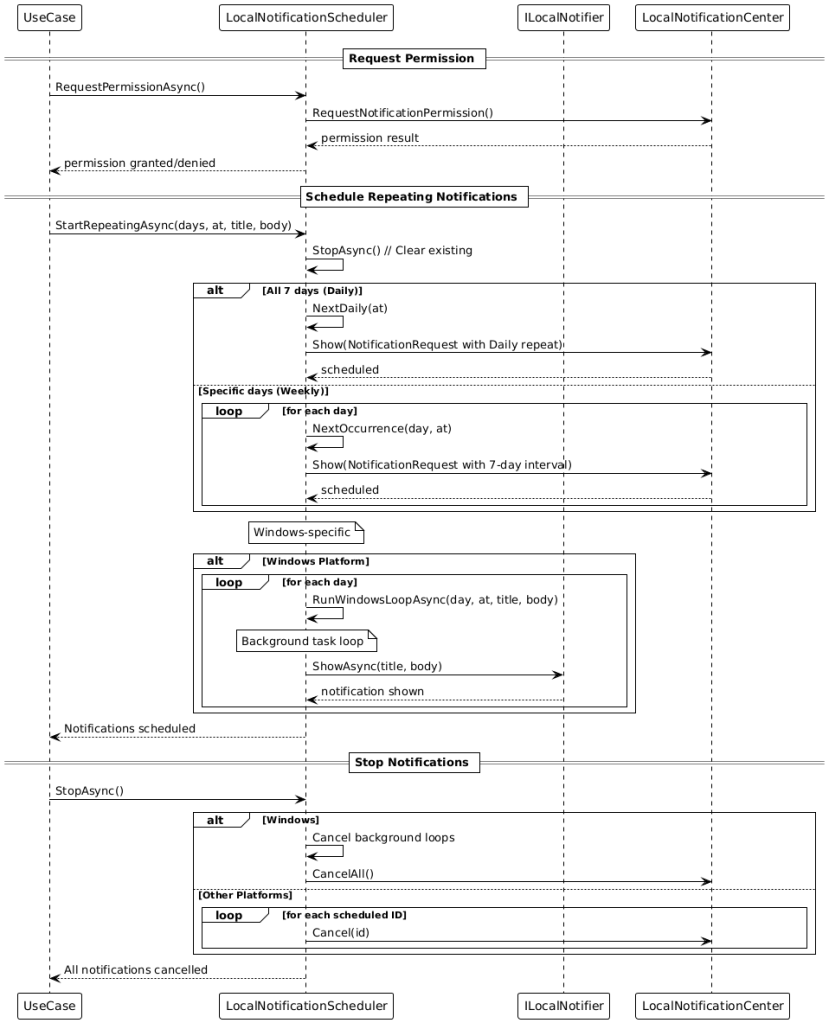
Smart notifications help in everyday use: when the balance is low (below €4.50), the app reminds the user at 10:30 by default to top up. For favorite dishes, notifications are automatically scheduled on the relevant weekdays (default 11:00). The implementation is optimized per platform—iOS uses UNUserNotificationCenter, Android uses AlarmManager, and Windows uses a local notifier. Notification times are configurable.
The app also provides AI‑powered recommendations. If the external Gemini‑based recommendation endpoint is available, personalized suggestions are fetched over a secured HTTP interface. If the external AI is unavailable, a deterministic on‑device fallback algorithm ranks dishes based on the user’s preference profile. A text‑similarity step robustly matches generic AI suggestions to the actual dishes available in the weekly menu.
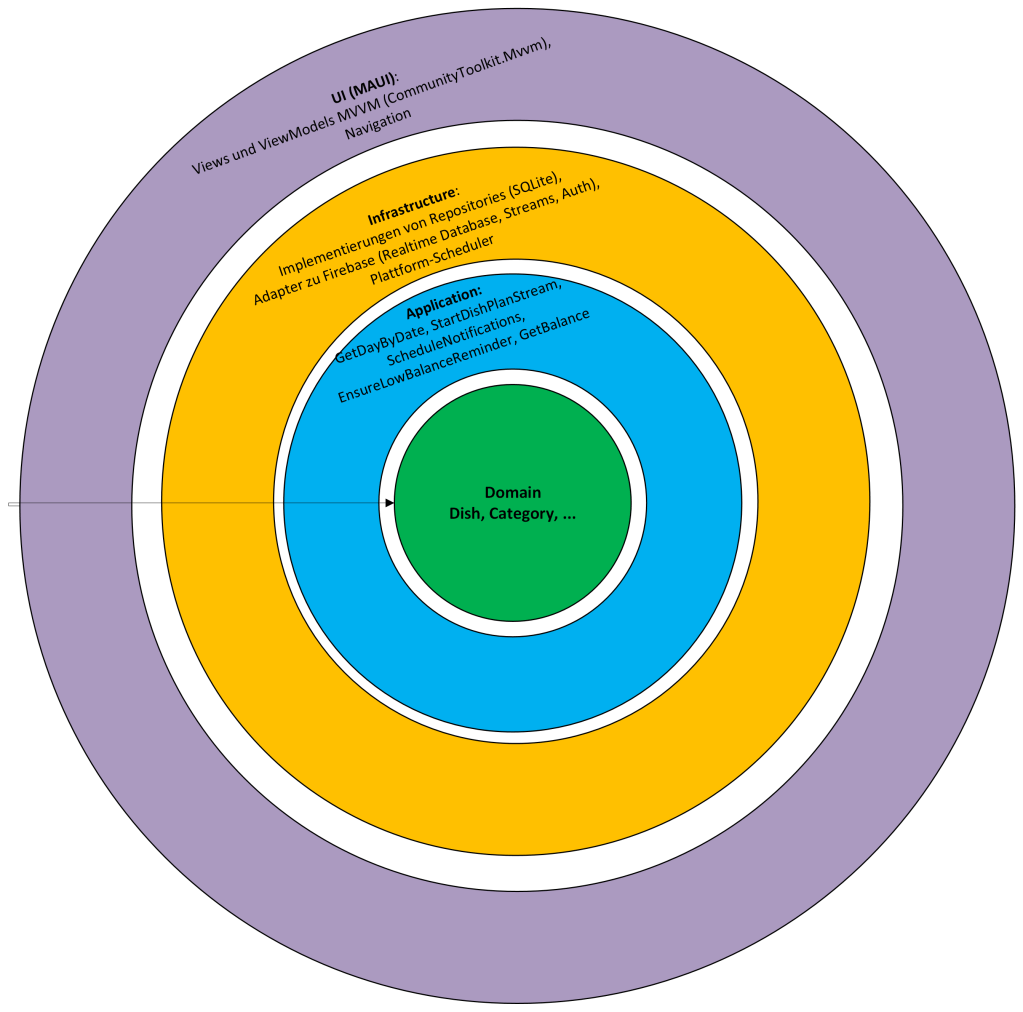
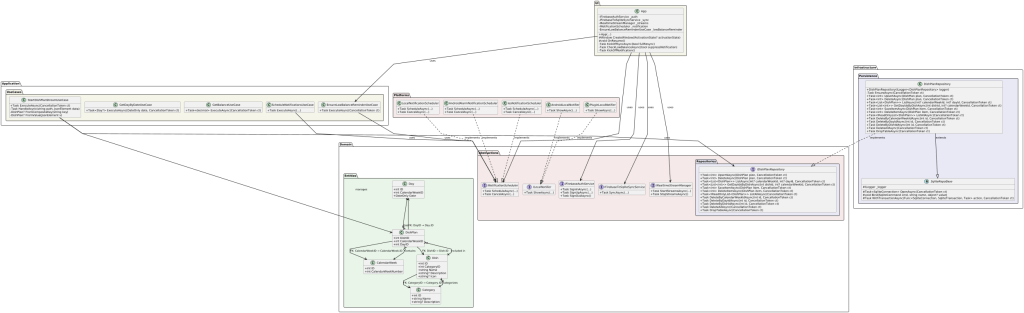
3. Architecture Overview The solution follows Clean Architecture:
• Domain: Core entities (e.g., Dish, Category, Day, CalendarWeek, DishPlan) and business rules without technical dependencies.
• Application: Use cases such as GetDayByDate, StartDishPlanStream, ScheduleNotifications, EnsureLowBalanceReminder, GetBalance. They orchestrate domain logic and communicate with infrastructure and UI via interfaces.
• Infrastructure: Implementations of repositories (SQLite), adapters to Firebase (Realtime Database, streams, Auth), platform schedulers for notifications, HTTP clients for external AI.
• UI (MAUI): Views and ViewModels using MVVM (CommunityToolkit.Mvvm), navigation via Shell, responsive layouts and platform specifics.
Dependency injection is implemented with Autofac. Modules remain swappable and testable. This setup enables targeted mocking in unit tests and clean composition of platform implementations.
Why I chose Clean Architecture for a mobile app (and not classic Layered, Onion, or Hexagonal)
Clean Architecture strictly separates Domain & Use Cases from frameworks, UI, and data sources. For mobile (e.g., .NET MAUI), this is invaluable: UIs differ per platform, lifecycles are fragile, offline‑first & sync are demanding, and tests should run without an emulator. Clean gives stable, testable cores—everything platform‑specific hangs on the outside.
What is Clean Architecture?
Core elements (inside → out):
• Domain: Entities/value objects + business rules (pure, without technology dependencies)
Dependency Rule: Dependencies point only inward. UI → Application → Domain. Infra depends on Application interfaces, not the other way around.
Result: Domain & Use Cases are framework‑free and easy to unit test.
Why Clean Architecture is especially good for mobile
a) Platform diversity & lifecycles
• iOS, Android, Windows have different APIs (notifications, storage, backgrounding). ⇒ Platform code stays on the outside (Infrastructure); Domain/Use Cases remain unchanged.
b) Offline‑first & sync
• Use cases encapsulate orchestration (delta sync, conflict handling, idempotency). ⇒ The same logic works with local SQLite and later cloud synchronization.
c) Evolvability
• Swap Firebase for another backend? Change the notification plugin? ⇒ Only adapters change; the use‑case ports stay stable.
d) Performance & resilience
• Use cases control retries/backoff, transactions, throttling → predictable behavior even on mobile networks.
e) Security & privacy
• Rules for data minimization/masking live centrally in Use Cases/Domain, not scattered across UI/Infra.
Why not classic Layered Architecture (3‑tier)
Typical issues:
• Leaky abstractions: UI knows DTOs/ORM entities from the DAL; DB changes bleed into the UI.
• Anemic domain: “Service classes” contain logic, entities are mere data bags → hard to test and reuse.
• Framework coupling: Business logic tied to frameworks/HTTP stack; replacing components is costly.
• Circular dependencies: Services reference each other; the dependency graph becomes fragile.
• Mobile specifics (lifecycle/permissions/background): Where does this belong? Layered gives little guidance.
In short: Layered is often too vague and encourages UI→DB coupling. For mobile, that’s fatal.
Why not Onion or Hexagonal?
Important: Onion/Hexagonal and Clean are siblings. All three rely on dependency inversion and ports/adapters. The difference is focus and pragmatism.
Hexagonal (Ports & Adapters)
• Pros: Clear ports, good isolation of external systems
• Cons in mobile context: Tendency toward “port inflation” (many interfaces/adapters), which creates overhead for small/medium apps. Less guidance for shaping use cases.
Onion Architecture
• Pros: Domain at the center, layers around—clean
• Cons: Often doesn’t describe use cases as their own layer. In mobile, use cases (e.g., EnsureLowBalanceReminder, StartDishPlanStream) are the natural place for lifecycle, sync, and retry orchestration. Clean names this explicitly.
Why Clean is preferable here
• Use‑case‑centered: Precisely what you need with MAUI/MVVM—commands bind directly to use cases.
• Pragmatic structure: Enough rules to prevent chaos without Hexagonal overhead.
Bottom line: You could call it “Hexagonal with an explicit use‑case layer”—that’s essentially Clean.
builder.RegisterType<GetRecommendedUpcomingDishesUseCase>().AsSelf(); // consumed by VM via ctor injection
The UI only knows the use case; the use case only knows interfaces; the implementation depends outward.
Typical anti‑patterns Clean avoids
• Fat ViewModels: Business logic inside VMs instead of use cases.
• Service locator: Hidden dependencies; prevents tests.
• Framework leakage: HttpResponseMessage/SqliteConnection dripping into the domain.
• God services: One “DataService.cs” that does everything → untestable, unclear.
When alternatives might still fit
• Layered: Very small proof‑of‑concept/throw‑away, minimal logic, no offline/sync.
• Hexagonal/Onion: Large domain, many teams, strict interface contracts where extra port rigor is desired.
For a mobile product app with offline‑first, notifications, sync, and AI integration, Clean is the best balance of structure, testability, and pragmatism.
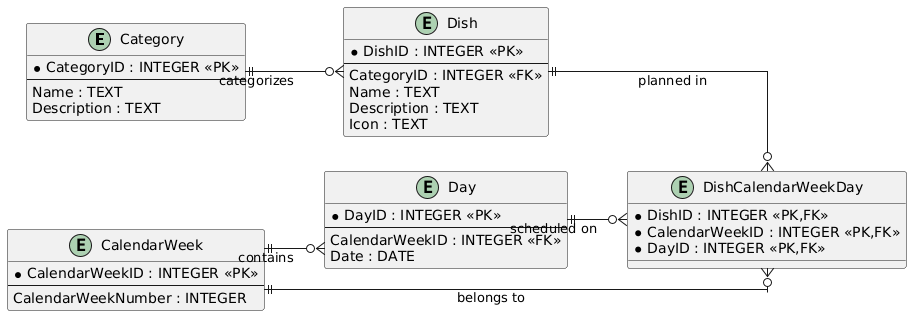
4. Data Model and Persistence Domain models are intentionally compact. Categories group dishes, which are part of a day within a calendar week. The relational mapping in SQLite uses clear foreign‑key relationships (e.g., Dish.CategoryID → Category.ID, DishPlan.DayID → Day.ID). Additional local tables for balance and transactions act as an event history. This event‑based design enables precise traceability and robust conflict resolution during up/down sync. A repository layer is used. A generic SQLite base construct (e.g., SqliteRepoBase) encapsulates connection setup, transactions, and parameter binding. Repositories like DishPlanRepository provide upserts, week/day queries, and bulk operations (e.g., delete by CalendarWeek). This reduces boilerplate and improves reliability.
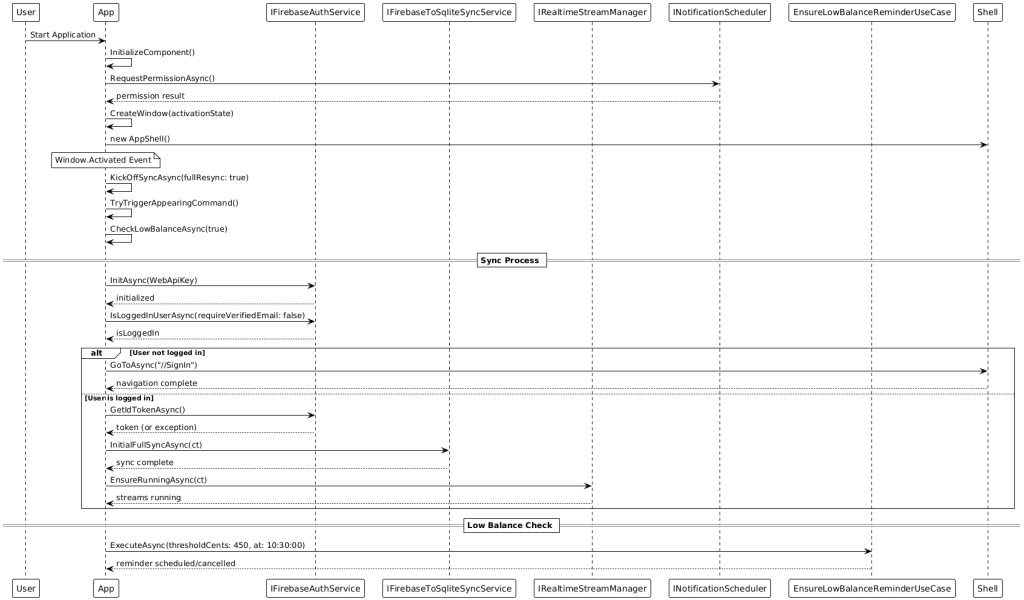
5.Synchronization and Offline‑First Synchronization is incremental and event‑driven:
• Realtime streams from Firebase update the local database nearly live.
• On app activation or network change, a delta sync is performed to close potential gaps.
• Conflict handling follows “last‑write‑wins” with server timestamps; domain‑specific merge rules (e.g., prioritizing confirmed menu items) can be added.
• Idempotent upserts ensure retries do not create duplicates.
The app is fully functional offline: local changes (e.g., likes, transactions) are persisted and reliably pushed to the cloud when available. A dedicated sync service batches operations and protects critical sections via SemaphoreSlim and CancellationTokens.
6.Authentication and Session Management Authentication uses Firebase Auth. Anonymous sessions can later be linked to email accounts without losing data. Tokens are renewed automatically; if a refresh fails, the app guides the user back to the sign‑in route in a controlled manner. All auth flows are represented in Shell routing, creating consistent navigation paths.
7. Notifications (platform‑optimised) Notifications are configurable and user‑centric. For low balance, a use case checks the balance and schedules a daily recurring reminder (default: 10:30). For liked dishes, weekday‑based reminders are scheduled (default: 11:00) if those dishes appear on future days of the weekly plan. Delivery is platform‑compliant:
• iOS: UNUserNotificationCenter with explicit permission prompt.
• Android: Scheduling via AlarmManager or WorkManager‑compatible strategies.
• Windows: Local notifier with a lightweight background loop that checks scheduled times.
Notifications are created idempotently and cleaned up before rescheduling to prevent duplicates. Actions can trigger deep‑link navigation (Shell route).
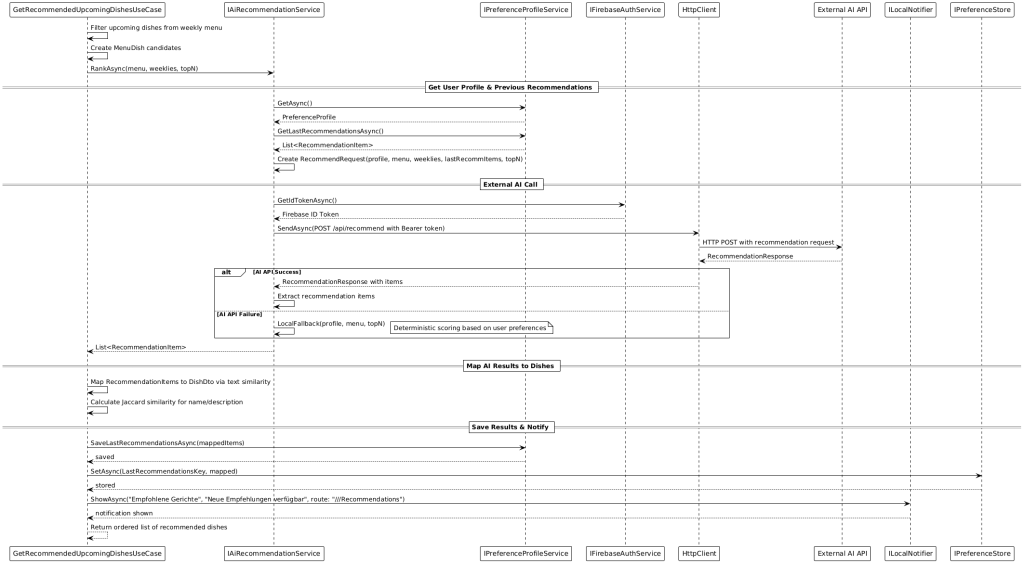
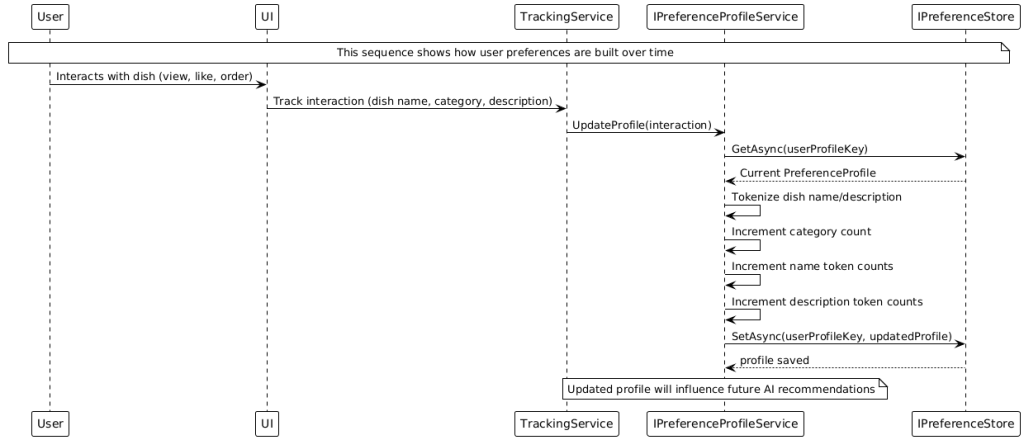
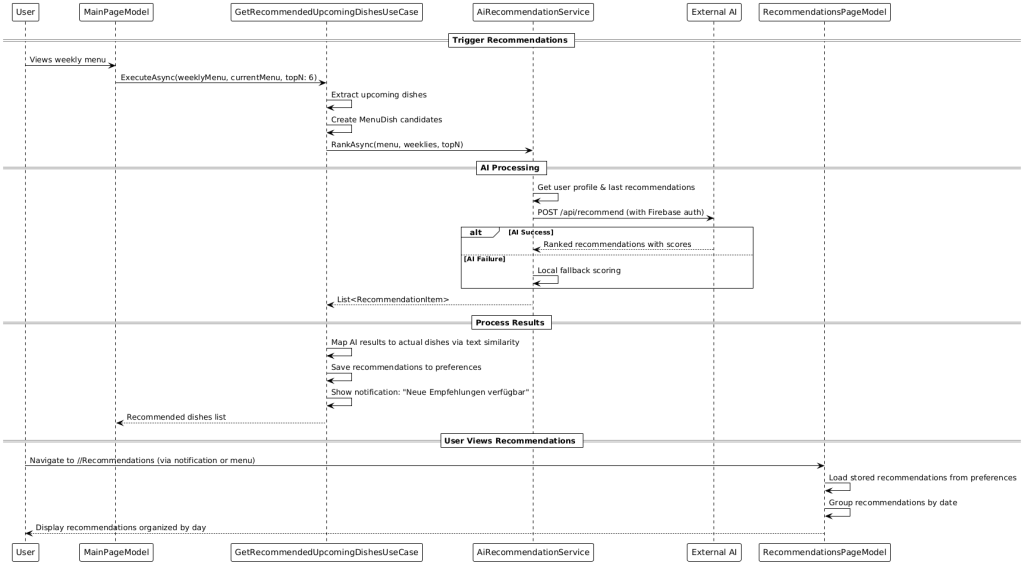
8.Balance Management Balance is tracked in euro‑cents to avoid rounding errors. Top‑ups and debits are stored as balance events and displayed in the transactions history. By default, €4.50 is debited per meal. When offline, bookings are recorded locally and reconciled with the backend at the next opportunity. A use case ensures low‑balance reminders are active only when the actual balance is below the threshold. 9. AI‑Powered Recommendations The recommendation pipeline consists of three stages:
1) Profile building: A profile service counts recurring categories and tokens from dish names/descriptions based on user interactions.
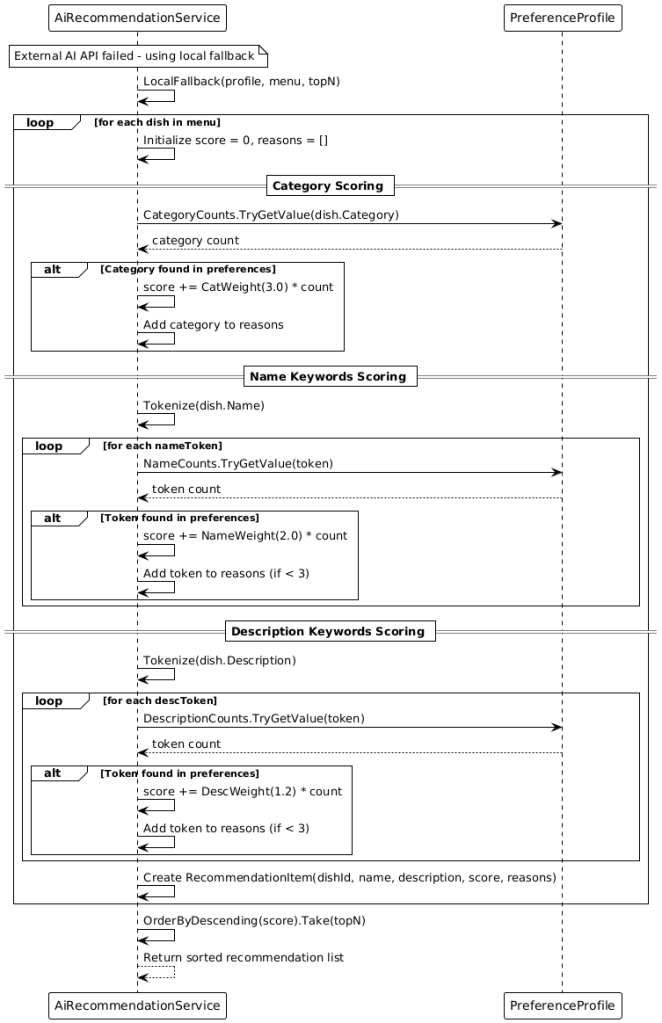
2) Ranking: Primarily, an external AI API (Gemini‑based) is called through a secured HTTP endpoint (authentication via Firebase ID token). If results are returned, they are processed; otherwise, a local fallback algorithm weights dishes based on the profile (e.g., categories > name tokens > description tokens) and produces a deterministic ranking.
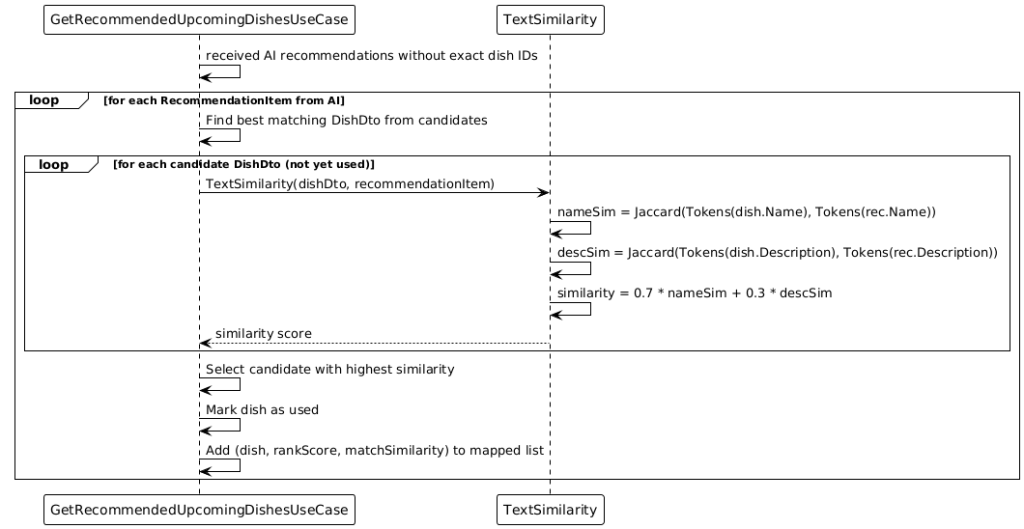
3) Text‑similarity matching: Since external recommendations may not always contain exact IDs, they are matched via similarity (e.g., weighted Jaccard of name/description) to the actual dishes in the weekly menu. The best matches are stored and can be announced via notifications.
10. UI/UX and Cross‑Platform The UI is responsive across smartphones, tablets, and desktop. .NET MAUI provides native performance on iOS, Android, and Windows. The MVVM structure with CommunityToolkit.Mvvm enables clear state management, bindings, and commands. Navigation is via Shell, providing consistent deep‑linkable paths (e.g., from notifications).
11. Fault Tolerance, Logging, and Observability
A comprehensive error‑handling and logging concept ensures stability. Important paths (auth, sync, payments, push scheduling) use structured logging. Crashlytics captures crashes with context; Analytics provides usage metrics. Repeatable operations are idempotent; transient errors trigger targeted retries with backoff.
12. Security and Data Protection Data minimization: Only data required for the purpose is stored.
The app reacts to start/resume/sleep with targeted actions: upon activation, sync and reminder checks are started. SemaphoreSlim protects critical sections (e.g., one‑time initial kick‑off), MainThread dispatching guarantees UI safety, and CancellationTokens prevent resource leaks in abort situations.
16. Configuration and Defaults
• Meal price: €4.50 (configurable)
• Low‑balance threshold: €4.50
• Low‑balance time: 10:30 (local)
• Dish reminders: 11:00 (local)
• Top‑N recommendations: e.g., 6
17. Extensibility and Roadmap
• Payment provider integration (external wallets like Stripe)
• External AI dependency: mitigated by local fallback. • Network volatility: addressed by offline‑first and idempotent upserts.
Clean Architecture Overview
App Start Sequence Diagram
Menu Synchronisation
Data Synchronisation
Notification Handling
User Authentication
Notification Action Handling
AI Recommendation Service
AI Recommendations Offline
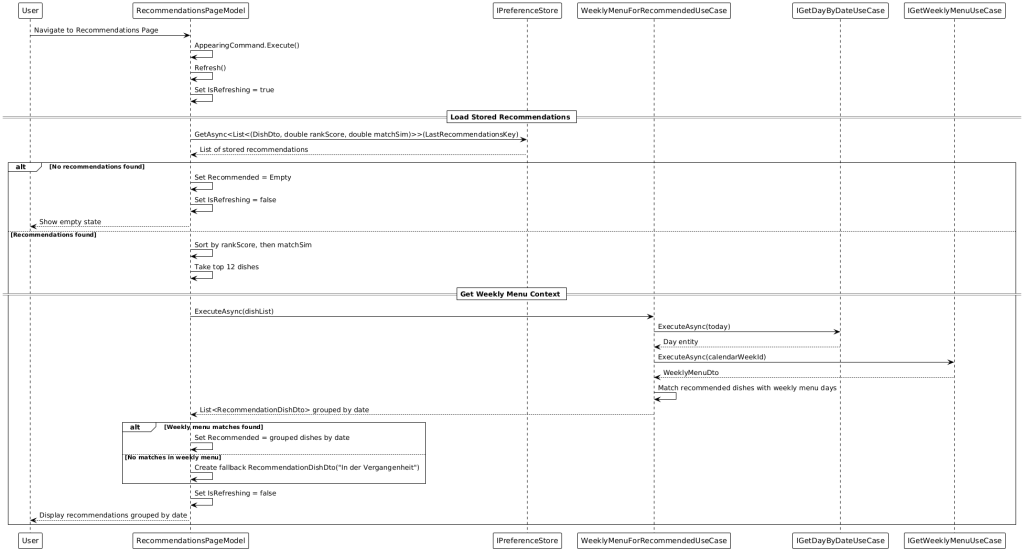
Recommendations Page Model
AI Response Mapping
User Profile Update
Complete Recommendation Flow
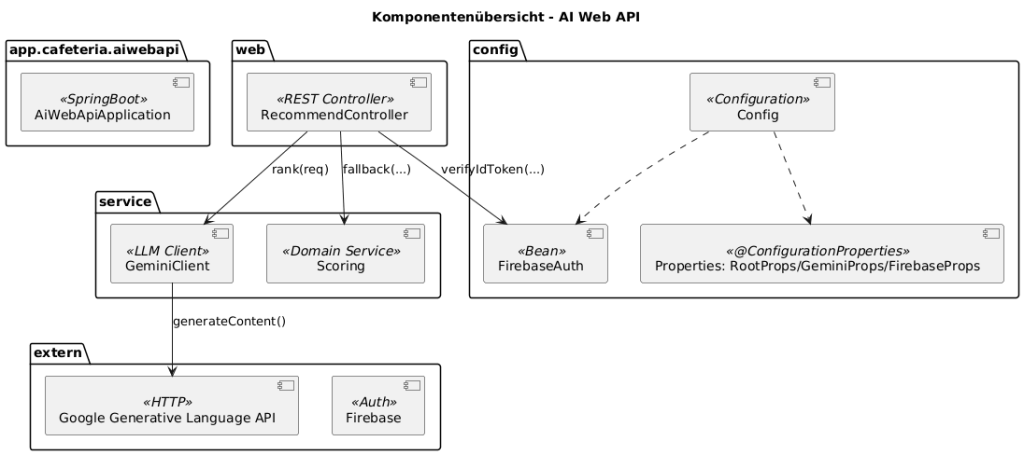
19. AI Web API on Spring Boot Why a Spring Boot edge server for MAUI (instead of direct access to Gemini)
Summary: The Spring Boot edge server is the trust and control point. It protects secrets, enforces auth/quotas/policies, normalizes responses, provides fallback scoring, logging, and cost control—and satisfies privacy/compliance better than a direct App→LLM call.
Security & Secrets
• API‑key protection: No Gemini key in APK/IPA (easy to extract). The key remains server‑side.
• Auth enforcement: The server verifies Firebase ID tokens.
Resilience & UX
• Seamless fallback: On LLM timeout/error → local deterministic scoring (same API contract).
• Circuit breaker/retries/backoff: Solve network problems once centrally—instead of in all app variants.
Observability & Costs
• Central telemetry: Latencies, error rates, fallback ratio, prompt version—visible in the backend.
• One backend for all clients (MAUI iOS/Android/Windows). No duplicated integration/policy work per platform.
Why not MAUI → Gemini directly?
• Key‑leak risk in the app, hard to protect.
• No centralized and consistent prompt version.
• Less observability (debugging/tuning harder), no server‑side fallback.
Note: For purely iOS‑native scenarios, there are client‑side SDK options, but for a cross‑platform MAUI product app with offline‑first, notifications, sync, and clear operational requirements, the Spring Boot edge server is the more robust choice.
User authentication is via Firebase Auth with email and password. Registration and sign‑in are straightforward, support password reset via email, and allow linking anonymous accounts to email accounts. Automatic token renewal provides seamless session management without repeated user intervention.
• CAT_W, NAME_W, DESC_W: weights for category, name, and description similarity (configurable, e.g., 0.5/0.3/0.2)
• sim_cat: similarity of category tokens between PreferenceProfile.categoryCounts and the dish’s categories (e.g., weighted Jaccard on normalized tokens)
• sim_name: similarity from name tokens (profile.nameCounts ↔ dish name)
• sim_desc: similarity from description tokens (profile.descriptionCounts ↔ dish description)
• penalty(dislikes): deduction when tokens from the dislike list occur (configurable strength per hit)
Normalization & tokenization
• Lowercasing, trimming, splitting by your SPLIT pattern
• No categories → sim_cat = 0; fallback favors name/description
• Hard dislikes (e.g., allergens) ⇒ high penaltyFactor up to exclusion
Parameter hints (practice)
Weights: adjust CAT_W/NAME_W/DESC_W so their sum ≈ 1. Increase CAT_W if taxonomy labels are reliable; increase NAME_W/DESC_W if free text better reflects preferences.
Similarities: normalized to [0..1]. Common metrics: (weighted) Jaccard or cosine.
Penalty: simple model penalty = count * penaltyFactor (e.g., 0.2). Clamp final scores to [0,1].
The realms of technology are ever-evolving, necessitating periodic assessments and revisions to ensure our projects stay optimized and efficient. Such was the fate of my audio-centric project. With a clear vision in mind and challenges identified, I embarked on a journey to re-engineer the architecture, a journey that led me to eliminate TCPServer communication and embrace the power of Raspberry Pi. This article offers an in-depth look into this transformative journey, highlighting the changes, improvements, and the rationale behind each decision.
The Choice of Clean Architecture
Before diving into the architecture’s specifics, it’s crucial to address an underlying principle that guided my decisions – the adoption of Clean Architecture. This architecture emphasizes a separation of concerns, ensuring that software remains independent of frameworks, UI, and external agencies. It primarily:
– Promotes Flexibility: The decoupling of software components means one can easily switch out parts without affecting the system’s core.
– Ensures Scalability: As the project grows, so can the architecture, seamlessly accommodating new features.
– Facilitates Testing: Components can be tested in isolation, ensuring rigorous quality checks.
New Architecture
Such benefits made Clean Architecture an evident choice, providing a robust foundation upon which the project’s functionalities could be built, tested, and scaled.
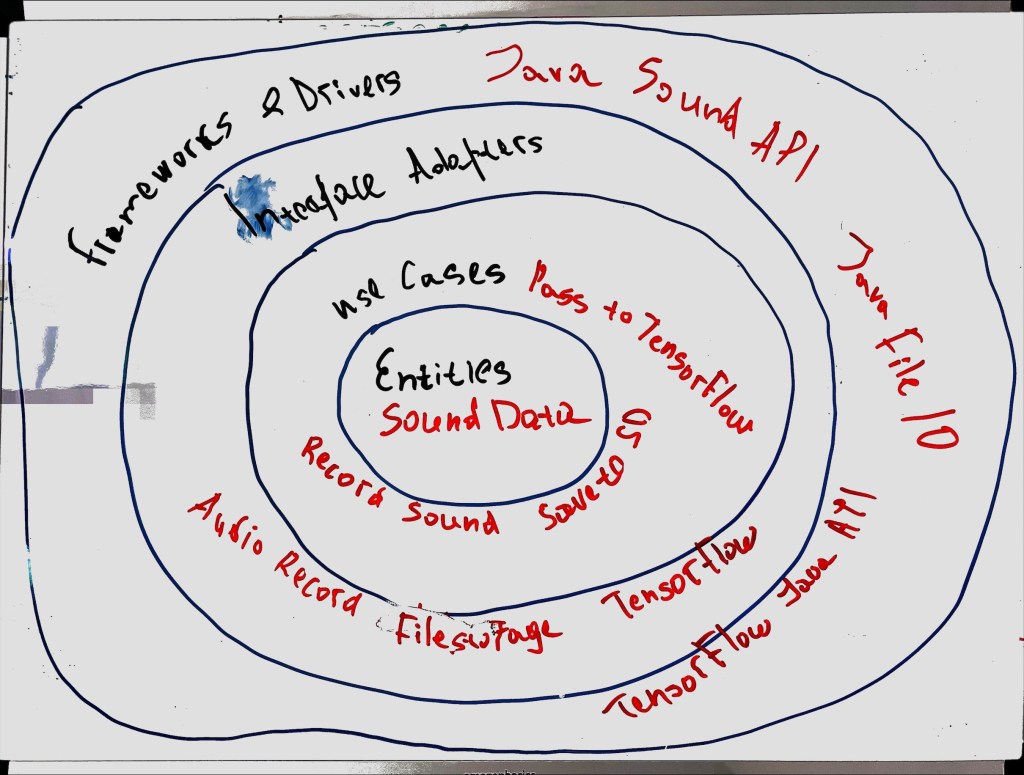
Entities & Use Cases:
Central to the project is the business logic module. Here, guidelines and requirements meticulously dictate audio recording processes, data storage mechanisms, and TensorFlow model integrations.
Interface Adapters:
– Audio Recorder Adapter: Through interfaces like Java Sound API, this adapter oversees audio recording, connecting seamlessly to the microphone.
– File Storage Adapter:Tasked with safeguarding audio recordings, it operates on the SD card or alternative storage mediums.
– TensorFlow Model Adapter: Serving as a conduit, it channels audio data to the TensorFlow model for precise processing.
Frameworks & Drivers:
– Java’s Sound API: The primary tool for capturing audio.
– TensorFlow’s Java API: Anchoring machine learning processes in the system, it ensures thorough audio data analytics.
The Decision to Remove Teensy 4.1
The journey towards optimization involved making some tough choices. One such decisive move was to distance from the combination of „Teensy 4.1 and microphone KY-038.“ The motivation? A glaring issue of inadequate audio quality. The audio recordings emanating from this setup were not just deficient in clarity but were also unsuitable for any meaningful analysis. In the domain of audio processing, where quality is paramount, this shortcoming was untenable.
Raspberry Pi came to the rescue. A potent device, it guarantees pristine audio recordings, ensuring that the captured data is ripe for accurate analysis. This shift not only addressed the quality concerns but also harmonized seamlessly with the principles of Clean Architecture, resulting in a streamlined, efficient project structure.
Comparative Analysis of the Two Architectures
1. Architecture with TCPServer and Teensy 4.1 + Microphone KY-038:
Primary Components:
Teensy 4.1 microcontroller and KY-038 microphone for audio capture.
TCPServer: Accepts and stores audio data transmitted from the Teensy.
Workflow:
Audio capture via the KY-038 microphone and Teensy 4.1.
Audio data transmission from Teensy 4.1 to the TCPServer.
Audio data storage for subsequent processing.
Challenges & Limitations:
Sub-par audio quality from the Teensy 4.1 and KY-038 combination.
Additional complexities due to TCPServer’s integration.
2. Revised Architecture with Raspberry Pi (sans Teensy 4.1):
Primary Components:
Raspberry Pi for efficient audio capture and processing.
Direct TensorFlow model integration, obviating the need for external servers.
Workflow:
Direct audio capture via the Raspberry Pi.
Audio data either stored on an SD card or immediately processed through the TensorFlow model on the Raspberry Pi.
Advantages:
Enhanced audio capture and processing using the Raspberry Pi.
Simplified workflow due to the absence of the TCPServer, leading to faster processing times and minimized data transfer issues.
In juxtaposing these two architectures, the Raspberry Pi-centric structure emerges superior. It promises streamlined operations, efficiency, and high-quality audio capture and processing.
In conclusion, adapting and innovating are integral to technological endeavors. This project’s metamorphosis, underlined by the principles of Clean Architecture and motivated by the need for quality, exemplifies this ethos. The transition to Raspberry Pi-centric architecture signifies a monumental leap forward, setting the stage for an efficient, high-quality audio processing future.
I hope this post finds you all in high spirits. Today, I had quite an adventurous day packed with exploration, tinkering, and (of course) a healthy dose of learning. Let me take you on a journey through my day!
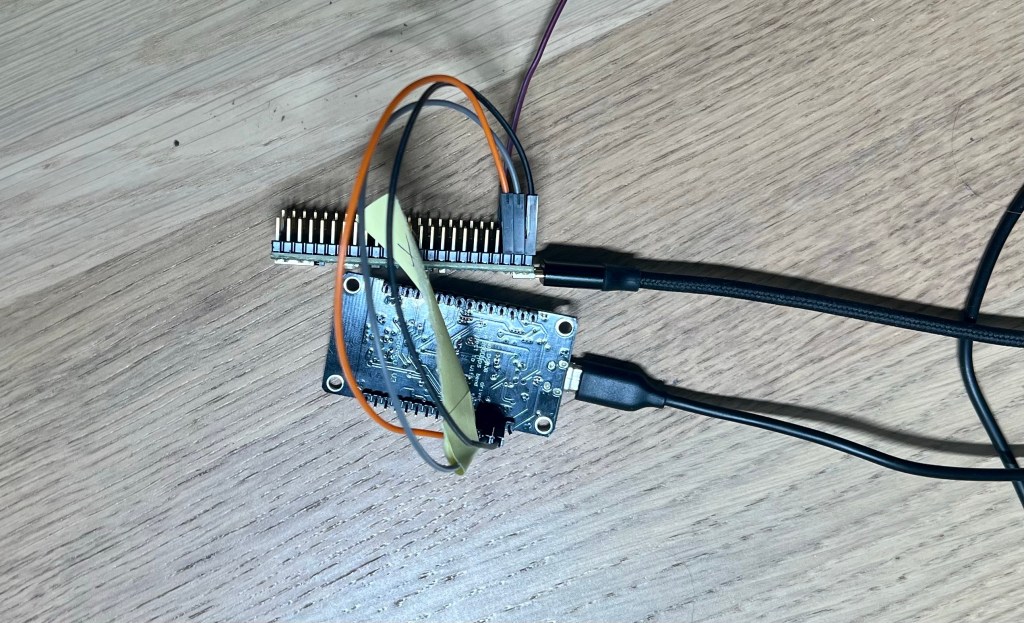
This morning started with a steaming mug of coffee and an interesting problem to solve – transferring a `.wav` file from a Teensy 4.1 microcontroller to an ESP8266 over a TCP connection. Who needs crossword puzzles, am I right? My goal was to get the Teensy board to send a file to the ESP8266, which would then transfer it to a server via Wi-Fi. Sounds pretty straight-forward, huh? But as any coder will tell you, it’s never as simple as it sounds.
After a few initial stumbles, I was able to successfully establish a TCP connection between the Teensy board and the ESP8266. Through some quality time spent with the Arduino IDE, a sprinkle of C++ code, and a fair share of debugging, I managed to send a string „test“ from Teensy to ESP8266. Small victories, right?
Next up on the challenge list was figuring out how to transfer an entire `.wav` file. I decided to store the `.wav` file on an SD card and read it using Teensy 4.1. And believe me, having the Teensy 4.1 board with a built-in micro SD card slot felt like a real blessing!
With a deep breath, I plunged headfirst into the task. After a considerable amount of research and some trial-and-error, I figured out the correct way to wire the SD card to my Teensy board. I then transferred my `.wav` file to the SD card using my trusty computer.
The next step was to write a program for the Teensy board to read the `.wav` file and then send it to the ESP8266. I put on my coder’s hat and churned out some lines of C++ code to accomplish this task. With a bit of tweaking and debugging, and several cups of coffee, I was finally able to make the Teensy board read the file and send it to the ESP8266. Woohoo!
To say it was a productive day would be an understatement. I learnt so much and had a blast while doing it. The thrill of overcoming each challenge, the joy of seeing my code working as expected, and the immense learning along the way were exhilarating.
I am ending the day feeling accomplished, and with a sense of eager anticipation for tomorrow’s challenges. I will keep you all updated on my progress.
Until next time, keep exploring, keep learning, and remember, the world is your oyster!
Hey everyone! You know that feeling when you’ve been working on a project that you’re really excited about? Well, I can’t wait to share mine with you!
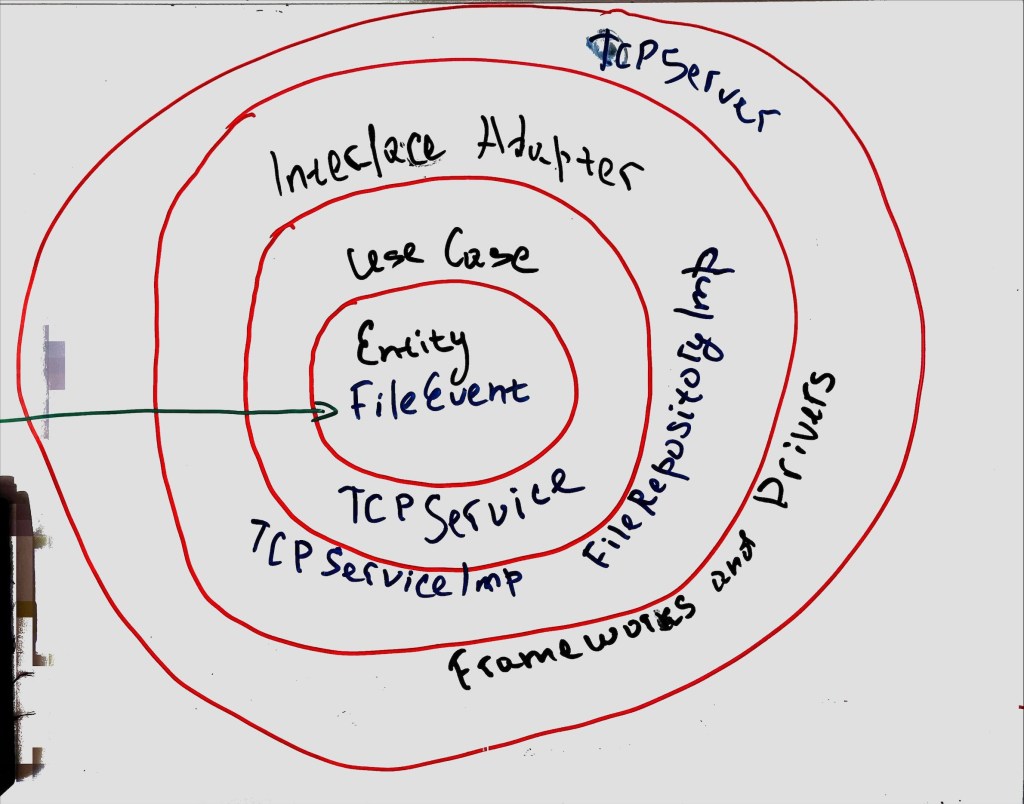
I’ve been building a TCP Server that receives .WAV files from a client and saves them to a special spot. To make things even more interesting, I’m using a clean architecture – keeping everything nice and neat in their own separate layers.
The Grand Design
Let me take you on a tour of the architecture. Imagine a four-layer cake:
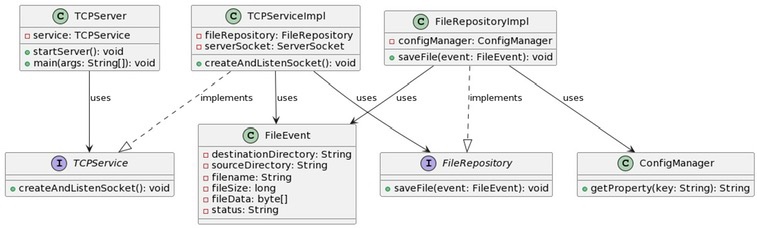
Entities Layer: The heart of the cake (or application, in this case) is the FileEvent class.
Use Cases Layer: The TCPService interface and its implementation, TCPServiceImpl, bring the action. They define and perform operations on our entities.
Interface Adapters Layer: FileRepository and FileRepositoryImpl handle saving those .WAV files we’re receiving.
Frameworks and Drivers Layer: Finally, at the top, we have TCPServer and ConfigManager. TCPServerlets us interact with the lower layers and ConfigManager keeps our settings in check.
Packaging Things Up
Inside this project, everything’s got its own home. I’ve got separate packages for different functionalities:
com.smartmachine.tcpserver houses TCPServer TCPServer, the heart of the application.
com.smartmachine.tcpserver.service is home to the service interfaces and their implementations.
com.smartmachine.tcpserver.repositorycontains repository interfaces and their implementations.
com.smartmachine.tcpserver.config keeps the configuration management classes.
com.smartmachine.tcpserver.model is where the entity classes chill.
Meet the MVPs
Shoutout to the key components of my project:
TCPServer: The entry point, it takes the help of TCPService to manage incoming client connections and file transfers.
TCPService and TCPServiceImpl: The guts of the business logic – processing .WAV files sent over TCP.
FileRepository and FileRepositoryImpl: The storage unit, they take care of storing the received .WAV files.
ConfigManager: The settings master, handling everything from server port to output directory.
FileEvent: Representing the data structure of the file event, including file data and metadata.
Keeping Things Running Smoothly
In any good adventure, you’ve got to plan for the unexpected. That’s why I’ve got basic error handling, ready for any hiccups like file not found, IO errors, and network errors.
Setting the Stage
And finally, all settings for the project are kept in a properties file. The trusty ConfigManager takes care of loading and accessing these settings.
When tinkering with my project and usage of Raspberry Pi for the storage of sound data, I found a few potential issues to be aware of:
Data Loss: Picture this: a power outage, a failing piece of hardware, or just a little mistake, and bam! Data’s gone. It’s something that can happen to anyone.
Running Out of Space: Those little Raspberry Pis don’t have a ton of storage space, and high-quality sound files take up a lot of room.
Data Corruption: Another headache can be corrupt data – whether from a sudden power cut, a system crash, or a software glitch.
Security Nightmares: If your Raspberry Pi is online, it can be vulnerable to hackers or malware.
Physical Hazards: A misplaced cup of coffee or a curious pet could spell disaster for your Raspberry Pi. Not to mention the risk of someone ‚borrowing‘ it without asking.
Here’s How I’m Tackling These Issues
After spotting these risks, I’ve come up with a few ways to manage them:
Squishing the Data: By using data compression, I’m managing to make those big audio files a lot smaller. I’m using lossless methods like FLAC, but there are other options like MP3 or AAC if you’re not too worried about losing a little audio quality.
Using External Storage: I’ve also hooked up an external SSD to my Raspberry Pi to give me a bit more room. It’s a bit tricky, but I’ve found plenty of guides online to help.
Backups, Backups, Backups: I’ve learned my lesson on this one. Regular backups can be a lifesaver. I’m using both an external drive and cloud storage to be safe.
Securing My System: I’m doing my best to keep things secure with regular software updates, strong passwords, and even a firewall. Plus, I’m looking into data encryption for added security.
Keeping My Device Safe: I’ve got my Raspberry Pi stashed in a secure spot where it’s safe from accidents (and ‚borrowers‘).
Powering Up: I’ve also invested in a reliable power supply to prevent data corruption from unexpected power cuts.
Tackling a project like this on your own can be tough, but with a little preparation and these tips, you can avoid these pitfalls and keep your project on track. Happy tinkering!
Title: Tackling Sound Data Storage Hurdles on a Raspberry Pi: A Personal Journey
Hi there! If you’re like me, playing around with a Raspberry Pi and creating a sound analysis project at home, you’ve probably bumped into some challenges. One of those is how to store sound data without hitting a wall. I’ve done some digging, and in this blog post, I’ll share some pitfalls I’ve discovered and tips I’ve learned along the way.
When tinkering with my project, I found a few potential issues to be aware of:
Data Loss: Picture this: a power outage, a failing piece of hardware, or just a little mistake, and bam! Data’s gone. It’s something that can happen to anyone.
Running Out of Space: Those little Raspberry Pis don’t have a ton of storage space, and high-quality sound files take up a lot of room.
Data Corruption: Another headache can be corrupt data – whether from a sudden power cut, a system crash, or a software glitch.
Security Nightmares: If your Raspberry Pi is online, it can be vulnerable to hackers or malware.
Physical Hazards: A misplaced cup of coffee or a curious pet could spell disaster for your Raspberry Pi. Not to mention the risk of someone ‚borrowing‘ it without asking.
Here’s How I’m Tackling These Issues
After spotting these risks, I’ve come up with a few ways to manage them:
Squishing the Data: By using data compression, I’m managing to make those big audio files a lot smaller. I’m using lossless methods like FLAC, but there are other options like MP3 or AAC if you’re not too worried about losing a little audio quality.
Using External Storage: I’ve also hooked up an external SSD to my Raspberry Pi to give me a bit more room. It’s a bit tricky, but I’ve found plenty of guides online to help.
Backups, Backups, Backups: I’ve learned my lesson on this one. Regular backups can be a lifesaver. I’m using both an external drive and cloud storage to be safe.
Securing My System: I’m doing my best to keep things secure with regular software updates, strong passwords, and even a firewall. Plus, I’m looking into data encryption for added security.
Keeping My Device Safe: I’ve got my Raspberry Pi stashed in a secure spot where it’s safe from accidents (and ‚borrowers‘).
Powering Up: I’ve also invested in a reliable power supply to prevent data corruption from unexpected power cuts.
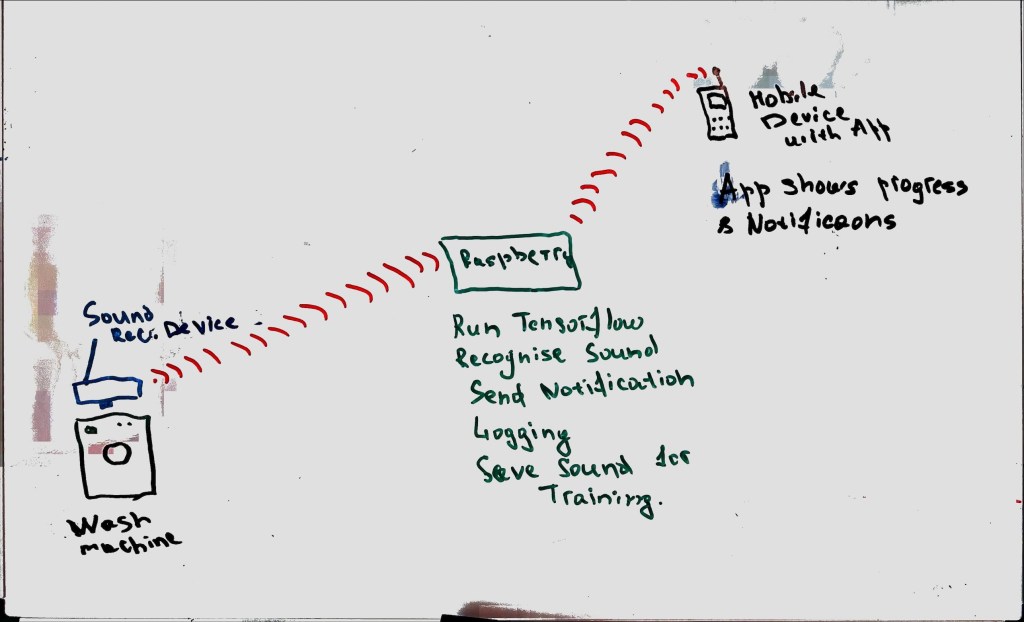
The journey towards creating an innovative AI sound recognition system for washing machines begins with establishing a robust server that records sounds from a microphone. For this purpose, I procured two critical components: an ESP8266 and a Teensy 4.1.
The ESP8266, a low-cost Wi-Fi microchip with full TCP/IP stack, will be the heart of my sound recording setup, serving as a transmitter. After connecting and soldering it together with the Teensy 4.1, a powerful microcontroller board, the system will capture the sounds from the washing machine and transmit the data over a Wi-Fi connection.
This is where the Raspberry Pi comes in. Transforming this affordable, compact computer into a server will allow it to receive the sound data from the ESP8266 transmitter. I have planned to run a TCP server on the Raspberry Pi, a design that will ensure seamless communication and sound data transmission.
Currently, I’m developing the architecture for this TCP server, and I’m leaning towards the Clean Architecture model for numerous reasons:
Separation of Concerns: By dividing the server’s functionalities into distinct layers, the complexity of the overall system is significantly reduced.
Improved Testability: Isolation of each layer promotes efficient unit testing, leading to a reduction in bugs and higher quality code.
Maintainability and Scalability: Thanks to the code decoupling, the system becomes easier to maintain, modify and scale, allowing for seamless addition of new features or changes.
Independent Development: Separate layers can be worked on independently, boosting productivity in team-based projects.
Framework Independence: The server’s business logic is not dependent on any specific framework, enabling easy technology switches without rewriting the core logic.
In essence, this is the blueprint for my server architecture. Though it’s in the preliminary stages, the sketch on the board outlines how the components interact (see attached image). This initial phase lays the groundwork for the innovative AI-powered sound recognition system, bringing us one step closer to smart laundry management.
Architecture for TCP Server
Central to this architecture is the Entity, represented in my design by FileEvent. Entities encapsulate the most critical business rules or the core logic of the system. In this case, FileEvent signifies the occurrence of a new sound file recorded by the microphone.
The next layer houses the Use Cases, which I’ve realized as the TCPService class. Use Cases encapsulate specific, user-driven software interactions, serving as the bridge between the business rules in the Entity layer and the external systems in the outer layers. The TCPService class manages the interactions between the microphone recording system and the server, ensuring the smooth transfer of sound files.
Following that, we have the Interface Adapters layer, which in my architecture is implemented as the TCPServiceImplementation and the FileRepositoryImplementation. Interface Adapters convert data between a format convenient for Entities and Use Cases, and a format suitable for things like the web, the database, the UI, etc. In my project, these classes handle the conversion of the sound data and the logging of the file events to a format that’s usable for the rest of the system.
The outermost layer of the architecture is Frameworks and Drivers, represented by the TCPServer in my system. This layer comprises tools like the database and the web framework. These are generally interchangeable without affecting the business rules. The TCPServer here manages the networking aspects of the system, like receiving and sending data over the Wi-Fi connection.
In conclusion, this layered architecture allows for better separation of concerns, independent development, increased testability, and framework independence. Each layer has its purpose, working together to create an efficient, robust, and scalable system that can recognize different sounds from a washing machine, analyze them, and notify the user. The promise of intelligent laundry management is becoming a reality, one layer at a time.
Every day, we embrace advancements in technology, integrating them into our daily lives to streamline tasks, improve efficiency, and ultimately make our lives easier. One such innovation in the pipeline is a smart system designed to interact with a common household appliance we all use – the washing machine.
The cornerstone of this system is a simple, yet intelligent device attached to the washing machine. The primary function of this device is to record sound, but what makes it unique is its ability to use these recordings in ways that redefine our interaction with appliances.
Recordings from the device are transmitted over Wi-Fi to a Raspberry Pi, a small and affordable computer used for numerous programming and DIY projects. The Raspberry Pi serves as a hub that uses the TensorFlow framework, an open-source software library for machine learning and artificial intelligence, to analyze the sound data.
Through TensorFlow’s capabilities, the system recognizes and categorizes the different types of sounds the washing machine produces. It can determine whether the machine is in the wash, rinse, spin, or end cycle, or if it’s idle, or even if it’s exhibiting any unusual noises indicating potential mechanical problems.
Once the sound is recognized and classified, the Raspberry Pi logs the information. But the intelligence of the system doesn’t stop there. A notification is then sent directly to the user’s mobile device, alerting them about the current status of the washing machine.
Simultaneously, the sound data is stored on the Raspberry Pi. This data is then used to train the TensorFlow models, allowing the system to learn from every cycle and continuously improve its sound recognition capabilities.
This innovative project highlights the transformative potential of integrating AI into our daily lives. The ability to train a model that recognizes various types of washing machine sounds and communicates with users in real-time brings a new level of intelligence to our homes. With such advancements, the future of smart home solutions looks promising.
es ist mir eine große Freude, Ihnen heute eine bedeutende Neuerung auf meiner Webseite mitzuteilen, eine Veränderung, die uns alle noch näher zusammenbringen wird.
Von Anfang an war es mein Ziel, eine Gemeinschaft zu schaffen, in der Wissen und Inspiration geteilt werden. Ich wollte einen Ort schaffen, an dem wir alle voneinander lernen und gemeinsam wachsen können. Mit der Zeit wurde mir klar, dass diese Gemeinschaft nicht nur lokal, sondern global ist.
In diesem Sinne freue ich mich, Ihnen mitteilen zu können, dass ich damit beginnen werde, meine zukünftigen Blogposts in Englisch zu veröffentlichen. Diese Entscheidung habe ich getroffen, um die Kommunikation zu vereinfachen und um mehr Menschen auf der ganzen Welt erreichen zu können.
Heute beginnen wir mit einem alltäglichen, aber interessanten Projekt: Unsere Waschmaschine smart machen.
Jeder, der einen Keller hat, kennt das Problem: Die Waschmaschine steht dort, weit entfernt vom gemütlichen Wohnzimmer oder dem Home-Office. Und wie oft passiert es, dass man vergisst, die gewaschene Wäsche herauszunehmen, einfach weil man keine Benachrichtigung erhält, wenn die Maschine fertig ist? Für mich passiert das ziemlich oft.
Basierend auf meinen Erfahrungen mit der Automatisierung meines Gartens und meiner umfangreichen Kenntnisse in der Softwareentwicklung, habe ich beschlossen, dieses Problem zu lösen. Mein neues Projekt? Meine Waschmaschine smarter machen!
Ich plane, verschiedene Technologien und meine Programmierfähigkeiten zu nutzen, um die Waschmaschine in unser Smart-Home-Netzwerk zu integrieren. Mein Ziel ist es, eine Lösung zu entwickeln, die mir eine Benachrichtigung sendet, sobald die Wäsche fertig ist. Auf diese Weise kann ich den Überblick behalten, ohne ständig in den Keller gehen zu müssen.
In den nächsten Beiträgen werde ich den Fortschritt dieses Projekts dokumentieren und Details zu den verwendeten Technologien und Herausforderungen teilen. Ich freue mich auf diese neue Herausforderung und bin gespannt, was wir gemeinsam lernen werden. Bleiben Sie dran, um mehr zu erfahren!

